
How to Create a Seamless Pattern in Illustrator
I decided to update my tutorial about creating seamless pattern in Illustrator and add few other ways that may be more convenient for you.
For those of you who have Illustrator CS6 or CC there is a good news, the process of creating seamless pattern became automatic, so now every beginner can solve this task easily. Just select your object and click on Object>Pattern>Make. When you do so, your objects will automatically transform into a pattern and the Pattern Options dialog box will appear. When you look at the Pattern Options dialog box you will see many options - try them and change until you get the result you want.
For those of you who have Illustrator of earlier versions - I'll tell now few ways and tools of creating pattern.
The first way
This way is perfect especially for easy patterns consisting of few objects.
Here is the final pattern we will receive.

1. Create a new 300x300 document.
Press Ctrl+N to open the New Document dialog box. Enter 300 px for the Width and Height values. Click OK.

2. Placing Your Elements
Place your objects on the artboard.(if you wonder how to draw objects here is my little tutorial http://yuliiabahniuk.blogspot.com/2015/12/drawing-with-blob-brush-tooltutorial.html)
Rotate them, change their size, colors and so on, just get the result you wish. Then, you'll see that some objects are outside artboard.

3. Make your pattern seamless.
Now it is time to make your pattern seamless. Just select all objects that are outside the artboard(every of 4 sides separately).

click on Effect>Distort&Transform>Transform

the Transform dialog box will appear. Set the following settings:

Set 1 copy, and set 300px(because the size of artboard is 300px*300px) vertical or horisontal - depends in what side of artboard you selected your objects. Press OK.
Now you see that your objects copied and moved on the opposite side:

Repeat the same with objects from the other sides. Note, that if you need to copy and move objects from right to left or from bottom to top, add "-" to 300px (-300px)

p.s. if you need to change size, or rotate object, the copied object will apply the same changes.

4. Only a few steps left to finish!
Select all objects(ctrl+A) and click on Object>Expand Appearance, so all copied objects become editable.
Now, there is a few variants what to do with your pattern. You can move it in Swatches panel, so you could use your new seamless pattern swatch on any object. Or you can cut unnecessary objects and for example to sell it on stock.
To put in Swatches panel:
Select the original square or create if you haven't already(select Rectangle tool, click on the empty place, the Rectangle dialog box will appear, set 300x300 size) Center it using following tools.

Paste in Back (Ctrl+Shift+[), and take off any fill and stroke.
We need to create this empty square so Illustrator can define the edges of the swatch. If we don’t include this empty square shape, we will have a weird looking pattern that is not seamless. Select all the artwork and drag it into the Swatches panel.

Here it is! That's all! You can use your new seamless pattern swatch on any object, just draw the shape and apply pattern clicking on it in the Swatches panel.

To cut unnecessary objects:
There are also a few ways to do this.
1.
The first way is quickly, but I don't like it because of one feature, I'll show you later.
So, to cut quickly you need to create an empty square 300x300px (artboard size) in front and center it. Select all and open Pathfinder window and press crop.

Done! Here is clear pattern without unnecessary objects
But! Look at your objects, they a chopped on strange pieces where the lines crossed.

And I don't like this, but if for you this doesn't matter - great!
2.
The second way is easy too, but it costs money and compatible only with Illustrator CS6 and CC. Here it is Super Magic Eraser script.
3.
The third way needs more time and patience, but for me it is perfect.
Create empty square 300x300px (artboard size) in front and center it. Select it and click Object>Path>Divide Objects Below

Now your pattern is divided by the rectangle line.
To delete all superfluous, take Direct Selection Tool(A) and select everything till artboard.

Click Delete button twice to remove all superfluous

And repeat this with every side.
Be careful, may leave small parts, enlarging it and check.

If you will find - delete in the same way using Direct Selection Tool(A) and Delete button.
Voila! Pattern is ready!

The second way
The second way is similar to new Pattern tool in new versions of Illustrator(CS6 and CC)
But it is not free and compatible only with Illustrator CS5, CS6 and CC.
Here it is Magic Pattern Light Illustrator script
I bough it and tried, but use very rare because I normally draw more complicated patterns for which the third way is perfect.
The third way
So, as I told you before, the third way is perfect for more complicated patterns, with a lot of details and tiny objects like dots, and through practice and experimentation, I‘ve found this way more convenient for me than other.
Here is the final pattern we will receive.

1. Create a new 300x300 document.
Press Ctrl+N to open the New Document dialog box. Enter 300 px for the Width and Height values. Click OK.
2. Placing Your Elements
Firstly you’ll need different elements to make up your pattern. Most importantly, they need to be vectors, so you’re able to scale them in size. I am going to use some vector objects I created earlier.

The aim is to place the elements perfectly in the square. So, you need to move, rotate, change size, colors of your objects to get the result you want.

Then, move your pattern outside the Artboard and create a new square.
3. Creating the Pattern Swatch
Take the Rectangle Tool (M) and create a square 100x100 px with stroke, but without a fill.

Still selected square, go to Effect > Distort&Transform > Transform and set the parameters in the dialog window: Move: Horizontal 100 px, Vertical 100 px and press OK.

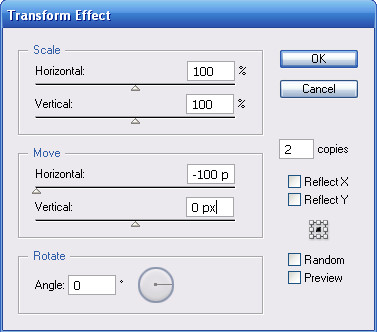
Repeat the same actions(Effect > Distort&Transform > Transform) but with new parameters:
Move: Horizontal -100px ,Vertical 0 px and set 2 copies. Press OK.
Repeat at last time with parameters:
Move: Horizontal 0 px, Vertical -100 px and set 2 copies. Press OK.

As the result you will have this:

By the contour of the central square set the guides and lock them, they will come in handy later.
Disable the stroke of the square and drag this object with transformations into palette Graphic Styles(p.s. not to repeat this actions every time,you can save this graphic style clicking on the top right corner menu of Graphic Styles dialog box and press on "Save Graphic Style Library...", and then open when you need, clicking in the same menu on "Open Graphic Style Library")

When you finish with this, press Delete to remove the square you created before from the Artboard.
Move your pattern to Artboard and change size proportionally to the size of 100x100 px. Here, guides come in handy to us. You can align the size of your pattern by it. If you have a colored background, make it 300x300px and lock.
Then, select your pattern by Ctrl+A and apply the created Graphic style to it.
Now you can see how your pattern looks. Here are many empty places and somewhere objects overlap. Move the objects to fill all space evenly, without seams.

When everything will be done, select all(Ctrl+A) and click on Object > Expand Appearance. Unlock background(if you have).
And then, to finish your pattern, use one of the ways I told you before - move it in Swatches panel(so you could use your new seamless pattern swatch on any object) or cut unnecessary objects(using one of three ways I told above)
That`s all!
Now, you can save it or export to different formats you need.
If you need to save it for sell in stocks, firstly check for defects as open paths, rasters, etc. You can do it using different special scripts or an extension "Vector Inspector". If you are interesting in it, I can tell about it in another post, just let me know! :)
Hope you like this tutorial:)
p.s. and sorry for my bad English, it is not my native language, hope everything is understandable :)
If you have any questions - feel free to ask me :)

0 коммент.